Visual Studio 2019 is now available for developers and dynamics 365 CE version 9.x Software Development Kit (SDK) too. However Dynamics 365 Developer Toolkit only supports for Visual Studio 2012, 2013, 2015 and it uses Dynamics 365 CE SDK 8.x assemblies and tools.
This article to make Dynamics 365 Developer Toolkit workable for VS 2019 and to prevent some common issues when setting up Plugin Library project to work with Dynamics 365 CE version 9.x core assemblies.
Special thanks to Sucheet Chavan for sharing useful information to the article.
Setting up Developer Toolkit for VS2019
Although Dynamics 365 Developer Toolkit doesn’t support after Visual Studio 2015, developers perform few workarounds to use the extension with VS2017. Following article is still valid for VS2019 with one change to the extension.
Dynamics 365 – Developer Toolkit & Extensions for VS2017
The only change is to change the extension.vsixmanifest file content according to VS2019, as follows;
<InstallationTarget Version=”[11.0,16.0]” Id=”Microsoft.VisualStudio.Premium”/>
<InstallationTarget Version=”[11.0,16.0]” Id=”Microsoft.VisualStudio.Pro” />
<InstallationTarget Version=”[11.0,16.0]” Id=”Microsoft.VisualStudio.Ultimate” />
No other changes to any of the steps including setting up the Tool Paths in the extension. Developer Toolkit uses SDK 8.x directory structure in the tool path, although you are planning to use SDK 9.x assemblies and tools.
Setting up VS Plugin Project with SDK v9.x Core Assemblies
Once the Dynamics 365 Developer Toolkit is setup in VS2019 and the tool paths are setup as above, VS2019 is ready to create the Dynamics 365 CE solution.
Step 1: Create a VS solution and add a CRMPackage project using Dynamics 365 Package template.
Step 2: Add a Plugin project using the Dynamics 365 Plug-in Library template.
This step will add a reference to the Plugin project in the Package project.

Note: Plugin project’s Target Framework is .NET Framework 4.5.2 and both Microsoft.Xrm.Sdk and Microsoft.Crm.Sdk.Proxy are in v8.x by default. The reason is that the the Dynamics 365 Developer Toolkit templates are used v8.x assemblies.
Step 3: Change the Target Framework to .NET Framework 4.6.2
Before referencing Dynamics 365 CE v9.x core assemblies, plugin project’s target Framework need to be upgraded. However it doesn’t support .NET Framework higher than 4.6.2 version.

Step 4: Upgrade Microsoft.Crm.Sdk.CoreAssemblies to v9.x

Step 5: Signing the the Plugin Assembly
Not a new step for CRM devs 🙂
Step 6: Add the plugins to the plugin project and create appropriate steps to plugins using CRM Explorer. It will also edit the registerFile.crmregister file in the package project.


Step 7: Change the Build Output path of the Plugin project
As the last step, Plugin project’s build output path need to be changed to CrmPackage project’s bin folder as follows.

If the output path remains the default, then the deploy process may interrupted and thrown the following error in the Output window of VS2019 as follows.

Error: Assembly bin\Debug\…..Plugins.dll could not be found.
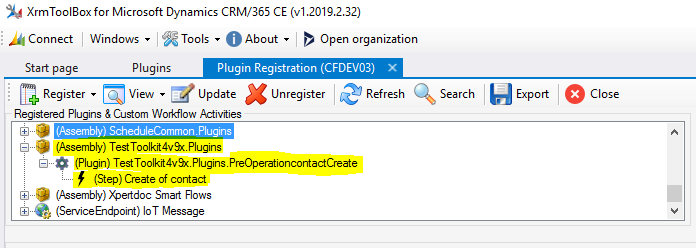
Step 8: Check the registered plugin and the step in Dynamics 365 CE

Following works for Visual Studio 2019 Community edition:
enjoy 🙂